How I set up a new MacBook
How I set up a fresh laptop.
In June 2023, Apple released the 15-inch version of the MacBook Air. I was due for a laptop upgrade, and it was the perfect form factor. It's surprising that they never had a "non-pro" laptop with a large screen size.
I was inspired by Swyx's ritual of documenting his Mac setup, so I decided to do the same. This is how I set up a fresh MacBook.
Native Settings
Upon creating an account on a new Apple laptop, you'll want to log in to your Apple account. Afterward, you'll have free rein over your machine.
- Go to System Settings, set the trackpad sensitivity to its maximum value, and make trackpad taps register as clicks. I'm so used to this workflow nowadays that anything else feels so slow and will drive me insane.

- Go to the control center settings to configure the menu bar. You'll want to show sound levels and battery percentage: both are super useful. On the other hand, hide the spotlight icon.
- For the "Internet Accounts," I use Google for all my contacts. Sign in with Google and then sync only contacts.
- Hide the Dock and remove any hide delay. You can make the Dock automatically hide in System Settings, but you'll need to use the command line to remove the Dock's hide delay. The command to do so is below:
# Remove hide delay for the Dock.
# https://apple.stackexchange.com/a/46222
defaults write com.apple.Dock autohide-delay -float 0; killall DockTier 1 Downloads
Configuring the native laptop settings allows you to operate the laptop without going insane. So far we haven't downloaded anything yet. The next items we download are "prerequisites" for doing almost anything, so we set them up first.
- Download Google Chrome and sign in with your Google Account. I have Chrome sync everything, so most of the legwork is done automatically.
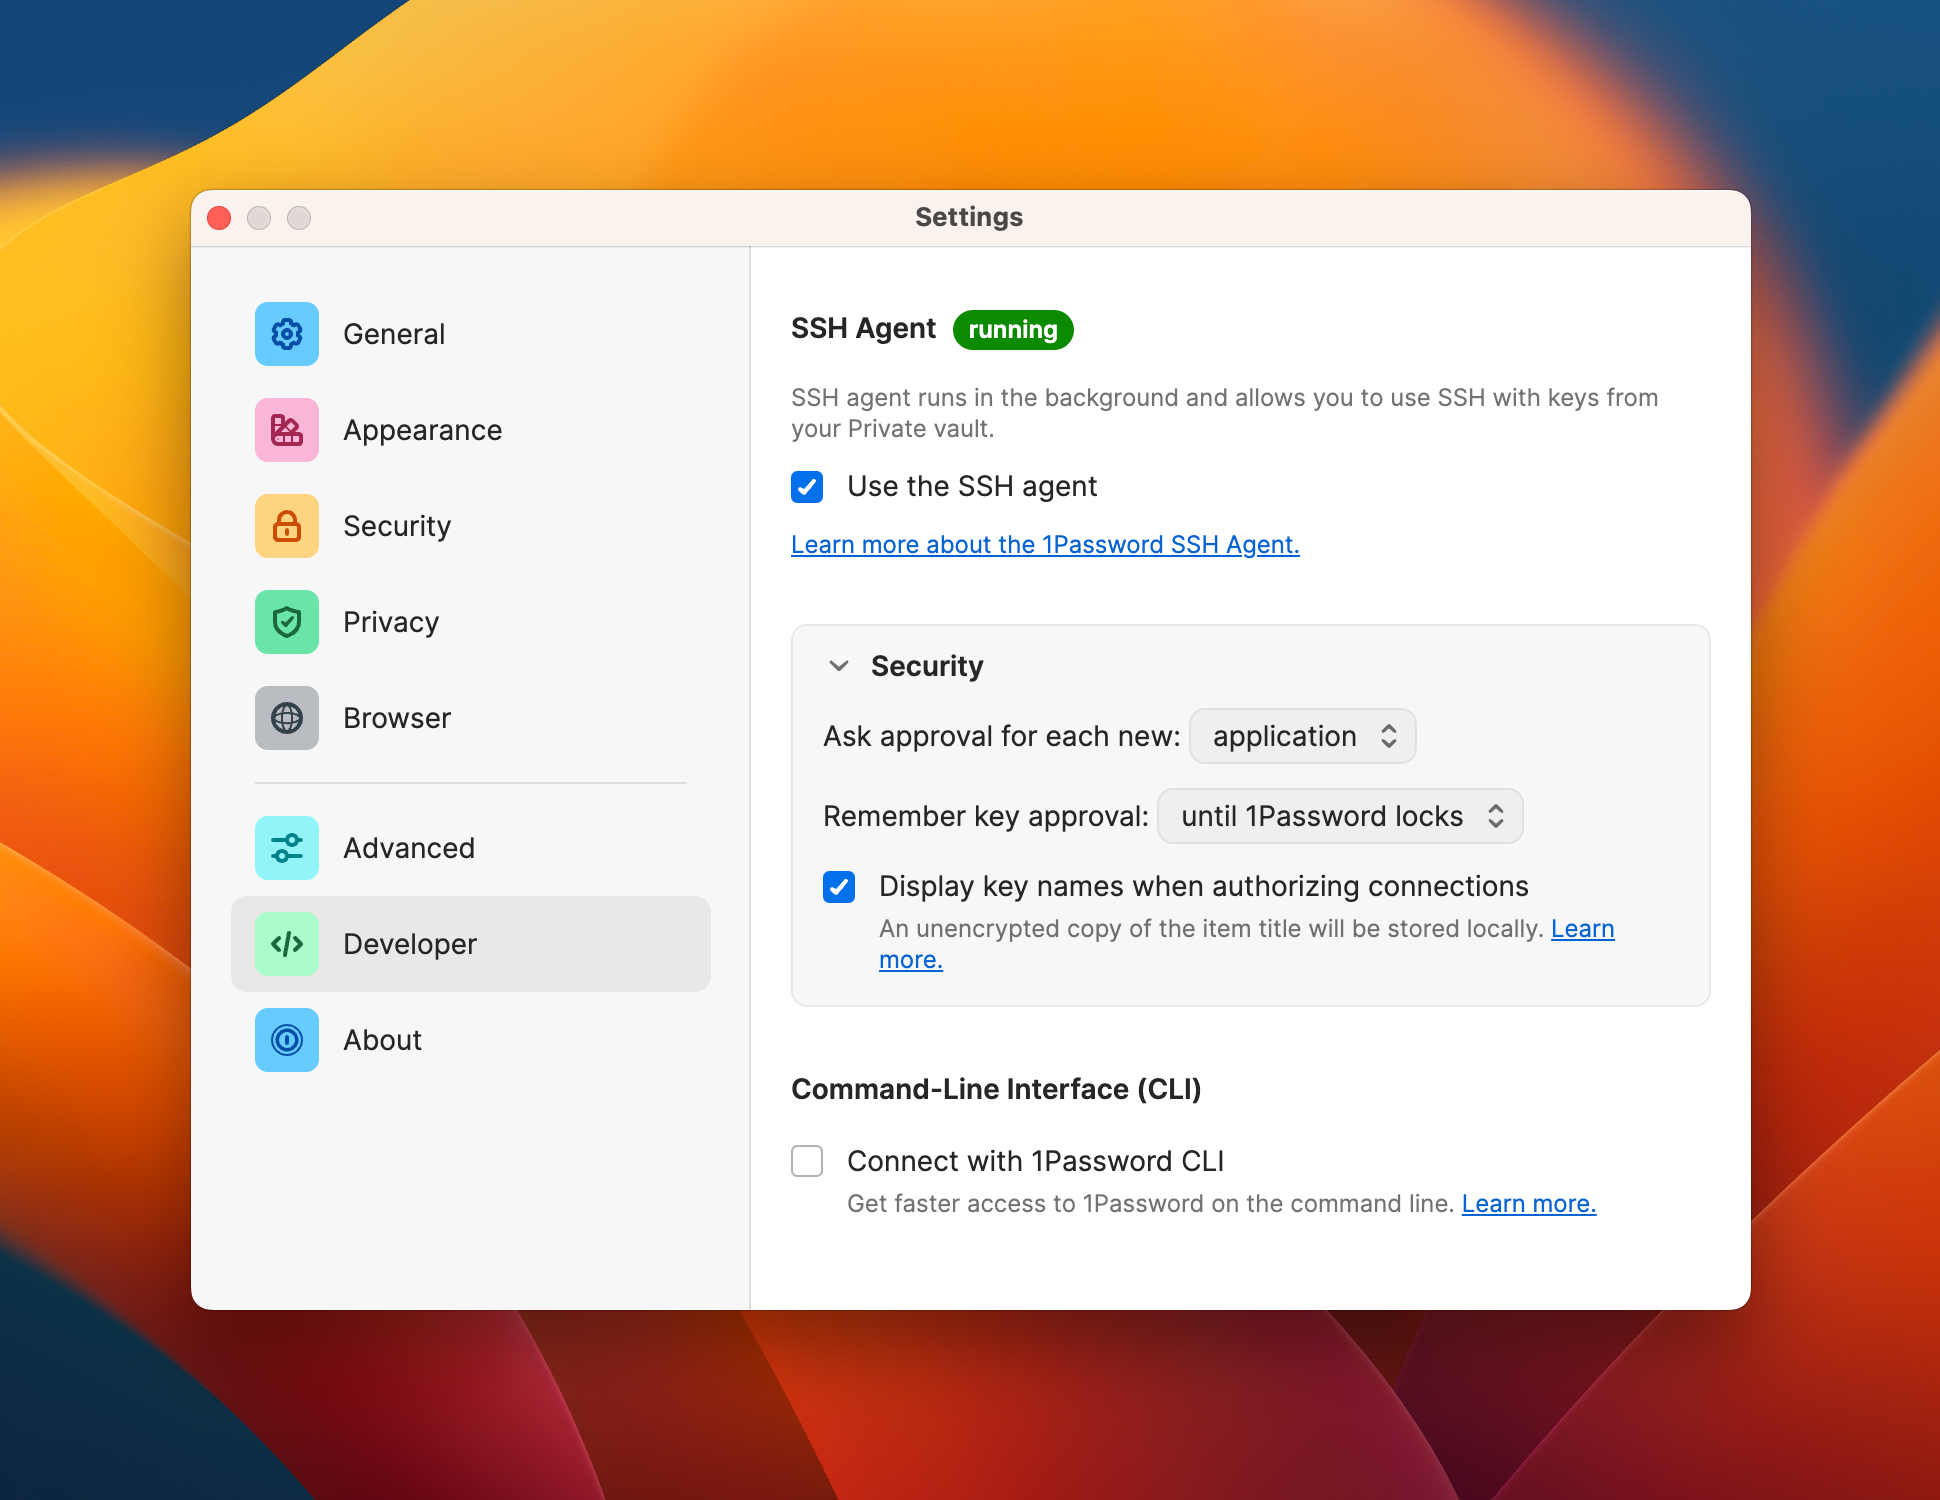
- Download and sign in to 1Password. It's necessary to authenticate with almost every single account I use. (I only memorize the credentials necessary to bootstrap my way to accessing 1Password.)
- Enable the SSH agent in 1Password. That allows you to use SSH keys stored in the password manager. Do not generate a new SSH key on the local machine.
- Download iTerm2. The Native terminal sucks. This allows us to peacefully operate on the command line. I know there are other modern terminals, but this one works well for me.
Command Line
 Andrew Liu
Fortunately, I've automated the vast majority of my command line setup in a git repository. As a result, I won't talk too much about the details. But you can read the blog post if you're interested. (It's a bit outdated though.)
All you need to do is run a one-line command:
curl -L andrew.cloud/dotfiles.sh | bashThe dotfiles setup script will not set up Homebrew, since that requires a new terminal session. You will need to do that manually.
/bin/bash -c "$(curl -fsSL https://raw.githubusercontent.com/Homebrew/install/HEAD/install.sh)"With Homebrew installed, you'll want to install several other packages. I have them in a script, but they're subject to change. Afterward, open up Neovim, and it will install a few other packages (like fzf) automatically.
brew install \
  bat \
  exa \
  fd \
  git-delta \
  jq \
  neovim \
  reattach-to-user-namespace \
  ripgrep \
tmuxFinally, import the existing iTerm settings. It'll set up the font and colors. You'll still need to install the recommended font for Powerlevel10k.
Tier 2 Downloads
The next few downloads are pretty core to operating my machine. They're not mandatory, which is why I don't install them immediately.
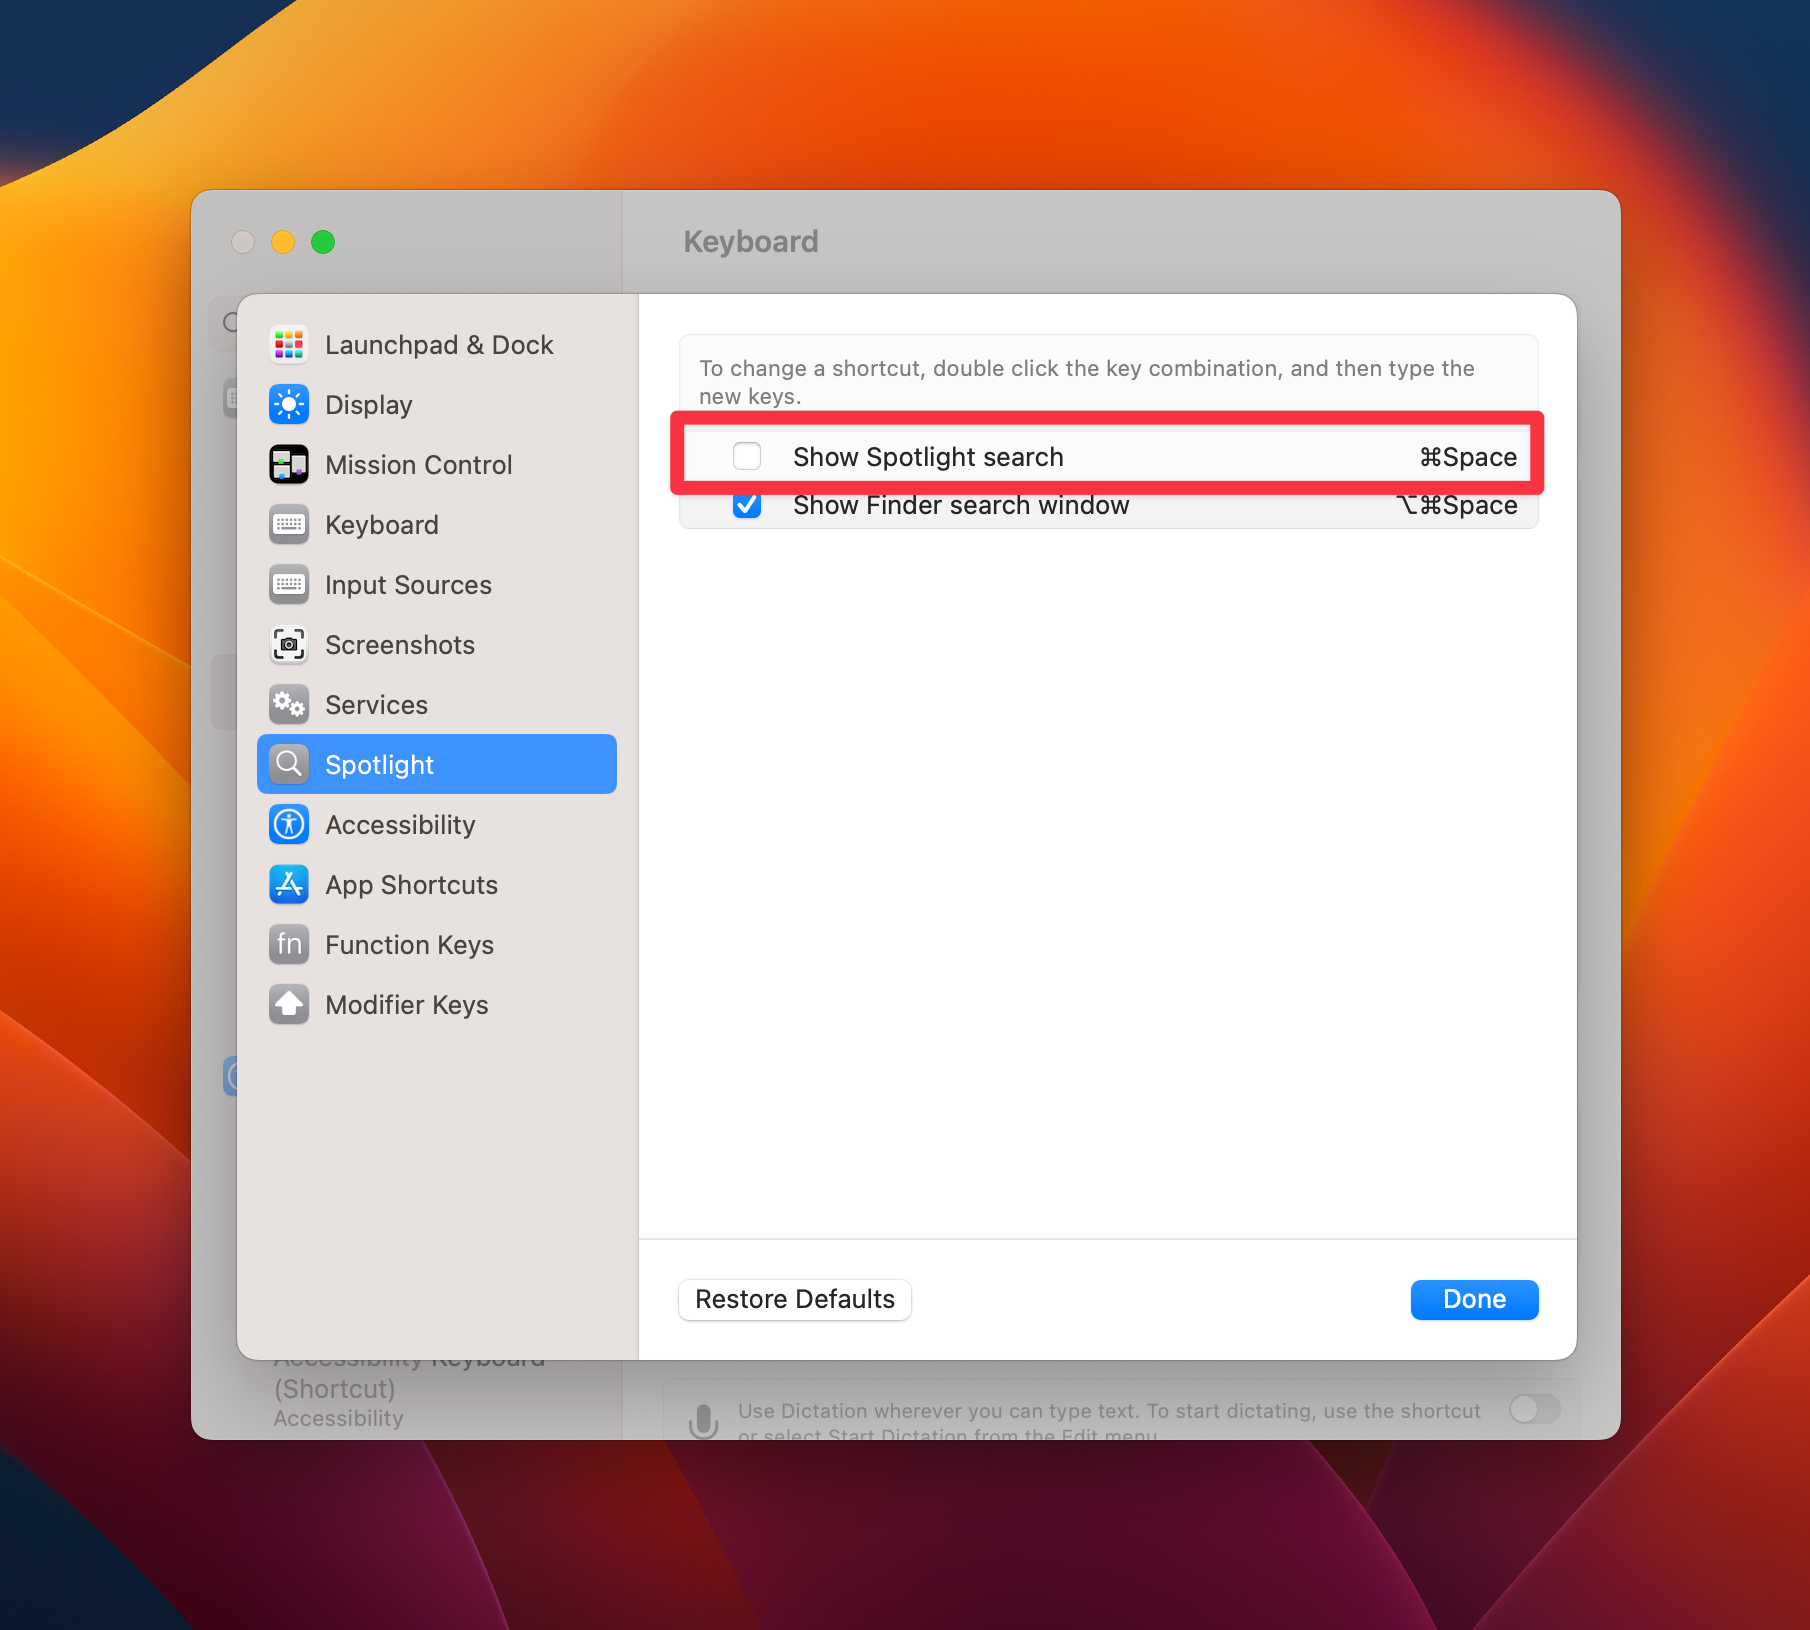
- Alfred: You'll want to disable Spotlight indexing and remove the default Spotlight shortcut. Then you can let Alfred use that shortcut.
- BetterTouchTool: Even if you don't have custom keyboard shortcuts, the drag-to-window-snap functionality is great on its own.
- Cleanshot X: Make sure it replaces any existing screenshot shortcuts. It's better than the native screenshot tool.
- Tailscale: Once you connect your new machine to the Tailnet, it allows you to be part of a network with your other machines without the hassle of setting up a VPN.
Tier 3 Downloads
The remaining downloads don't inhibit the normal operation of the machine itself. I do consider these the minimal set of programs that I use on a consistent basis, so I install them all immediately after wrapping up my tier 2 downloads.
They're listed in alphabetical order:
- AdGuard: This blocks ads that uBlock Origin misses.
- Cron: Notion's calendar app.
- Discord: For chatting with gaming communities.
- Dropbox: Syncs my files.
- KeepingYouAwake: Keeps the laptop awake.
- Keybase: For basic crypto operations.
- Obsidian: All my notes are here.
- Signal: My preferred chat app.
- Slack: For work-related communications.
- Spark: An email client. Be sure to get Spark 2. Spark 3 sucks.
- Spotify: For listening to music.
- Streaks: My habit tracker.
- Todoist: My to-do list.
- WhatsApp: For chatting with Android users and people living in third-world countries (same thing).
- WeChat: For chatting with Chinese relatives.
Wrapping Up
- Be sure to log in to various accounts as necessary. This includes both websites on the browser and the recently downloaded apps.
- Register any license keys as necessary. Most apps have a trial period, so there's plenty of time to do this. I store all of my license keys in 1Password.
- Clean up the apps on the Dock, if you haven't already.
- Be sure to revoke any old machine credentials as necessary. For example, you might want to remove old machines from Tailscale and Keybase.
Cool! You're done. Enjoy the new laptop. 🙃
15 inch macbook air is the best laptop that has ever graced this great earth
— Alexandr Wang (@alexandr_wang) June 14, 2023
praise to our benevolent overlords at apple for gracing us with such advanced technology from the future
may you continue to grace us with your benevolence and holy innovation
praise apple
praise


Comments ()