Writing a Discord Chatbot With GPT-3
I built a contest-winning Discord bot that uses GPT-3 to hold realistic conversations. We'll cover how you can do the same thing from scratch.
Several weeks ago, Replit partnered with 1729 to host a challenge to write a Discord bot. I won the grand prize by building an AI-powered chatbot.
The winning bot leveraged GPT-3 to intelligently chat with people and write React code on the fly. How does all of this work? Let's explore how it happened!
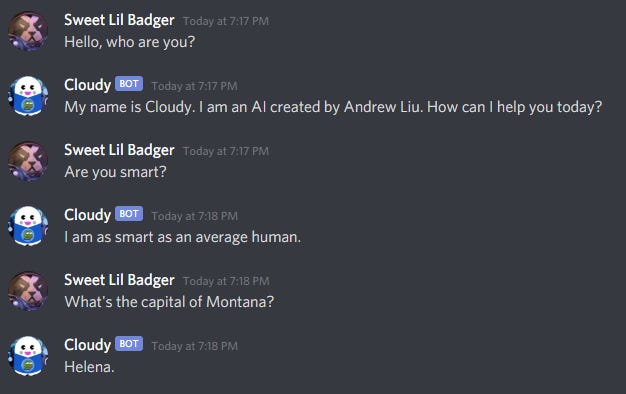
Introducing Cloudy 👋
For the 1729 challenge, I wrote a Discord bot named "Cloudy - The Hacker's Assistant". The bot provided various utilities for online communities, including:
Intelligent conversational chat (with memory) 💬
React component code generation 💻
Ethereum blockchain querying 💱
On-demand maps for Among Us 🕹️
To get a taste of Cloudy in action, check out the demo video.
Underneath the Hood 🎛️
When designing Cloudy, my mental model split the bot into a few distinct sections. Specifically, there were three core layers:
The infrastructure behind Discord bots. 🏗️
Interacting with machine learning APIs. 🤖
Deploying your bot. 🚀
All Discord bots need a certain degree of scaffolding before you get started. Cloudy leverages machine learning APIs to power its conversational chat and code generation. There's also a matter of shipping the bot so it can actually help out real users.
Once you understand all three layers, you should be able to build your own version of Cloudy. If at any time you're confused, feel free to refer to Cloudy's source code.
Setting up a Generic Discord Bot ️🏗️
All Discord bots share common properties that every developer should understand. These are also mandatory for getting started.
Creating an Application
You'll need to set up a Discord application as the first course of action. The application grants you API access and a bot account to use. There already exist step-by-step instructions for creating an application.
The process of setting up an application is more involved when it comes to permissions. If you lack the proper permissions, your bot may fail to work. Therefore, it's good to know what you want your bot to do before actually inviting it to any Discord servers.
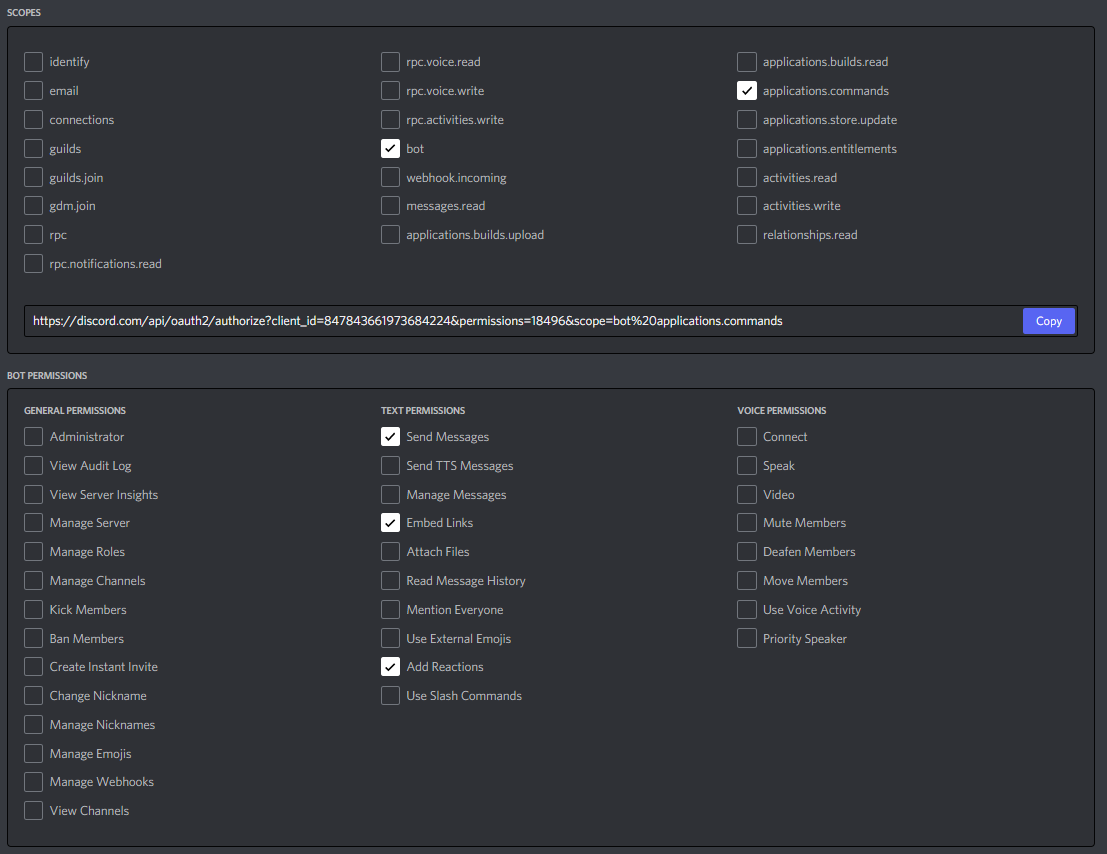
At the very least, a bot will need the bot scope. Bots that can take commands will also need the applications.commands scope. The necessary bot permissions vary depending on the specific functionality of the bot. These should be reasonably straightforward. For example, Cloudy uses three permissions:
Send MessagesEmbed LinksAdd Reactions
Client Libraries
Before diving too deep into the weeds, it's good to clarify what a Discord bot actually is.
Discord exposes numerous APIs to fetch updates within a Discord server. Many of these take the form of webhooks, such that developers get real-time updates. Discord's API also allows developers to post on behalf of applications.
Thus a Discord bot is a program that polls Discord's servers and posts updates as necessary. It's pretty straightforward if you think about it.
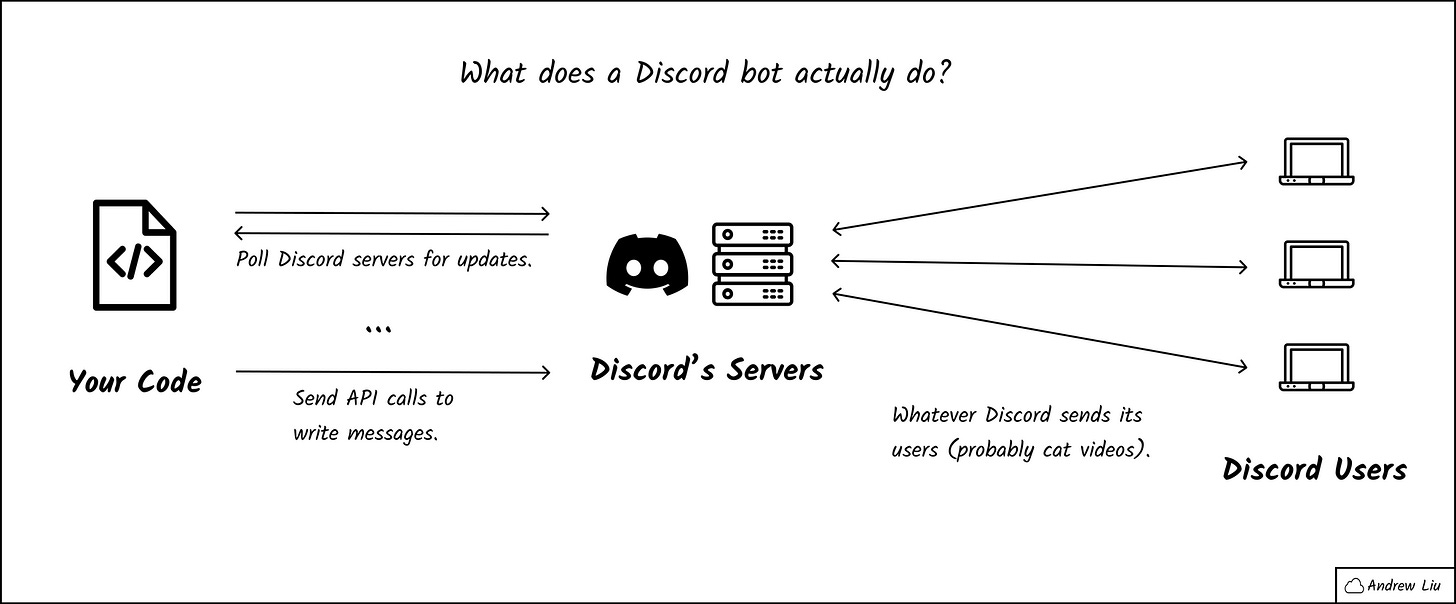
Many client libraries abstract away the Discord APIs pretty well. Instead of dealing with API calls, developers just handle event-driven logic. They only need to program what happens when there's a relevant update from Discord. Cloudy was written using one of these libraries. Pick your favorite programming language, and you'll probably find a decent client library. After that, getting started with a running bot becomes simple.
Slash Commands
Client libraries should suffice for most use cases (such as chatbots). However, most don't support sending commands to bots. After years of complaints, Discord eventually added first-class support for real bot commands. These are known as slash commands.
Slash commands work well for specific user-triggered actions, such as modifying settings. For example, Cloudy exposes commands to change its chat mode and fetch Among Us maps. For almost everything else, it can handle things when it receives messages.
Note that slash commands are a somewhat recent feature. Thus most client libraries lack support for the feature. Cloudy uses an extension library to support slash commands. However, you should note that these extensions may not exist for all languages.
With all pieces of infrastructure in place, these will roughly be the steps you take:
Create a Discord application.
Set proper permissions for your bot.
Choose a client library and initialize your repository.
Find an extension library that supports slash commands.
Build out the business logic for your bot.
At this point, you should have the scaffolding that all Discord bots contain. The next step is to build out the actual logic for the bot, which will diverge, depending on what you want. In the next section, we'll discuss how Cloudy leverages OpenAI for intelligent conversations.
Working with Machine Learning APIs 🤖
Cloudy's main feature offers realistic conversational chat. The responses themselves are generated by GPT-3, a text-based machine learning model. Under the hood, OpenAI handles a lot of the leg work. But you have to set things up properly or else the results become meaningless. Garbage in, garbage out.
The end-to-end lifecycle of a conversation with Cloudy looks something like this:
The user sends a message on Discord.
Cloudy the message from Discord's servers.
Cloudy generates a special prompt for GPT-3 and sends it to OpenAI.
OpenAI has GPT-3 generate a prediction and sends the results to Cloudy.
Cloudy converts the prediction into a chat response and sends it to Discord.
However, a high-level overview isn't enough to answer a few core questions:
What is GPT-3 and how does one access it?
How does one pass relevant data to GPT-3?
These have more nuanced answers that deserve to be covered in detail.
Setting Up the OpenAI API
To generate realistic chat responses, Cloudy uses a machine learning model called GPT-3. GPT-3 is the latest in a family of language prediction models created by OpenAI. For these language models, callers can pass in some text as an initial prompt. The model then generates text to complete the prompt.
For instance, GPT-3 can receive a snippet of text as its input, such as the example below.
Once upon a time there was...
It will then generate text that deems to be the most probable continuation of what it received. (The continuation length and other terminating conditions can be parameterized.) The output from the example may look something like the following sentence.
Once upon a time there was a sleeping cat. His name was Fluffy.
Unfortunately GPT-3 isn't open-source, unlike its predecessors. It's only available as a closed (and paid) API. To get access to the API, you'll need to join their waitlist. Despite the hurdles with accessing the model, GPT-3 is the best there is in terms of text completion. Once you have access to the OpenAI API, invoking GPT-3 is simple. Pass it a prompt and the model generates text.
Using GPT-3 in a Real App
Having a powerful machine learning model is great, but it's meaningless until we put it to work. In practice, that means converting your app data into a prompt that GPT-3 understands. It also entails transforming GPT-3's output into something useful for your app.
For Cloudy's chat feature, we build a starter prompt using previous chat data. From GPT-3's perspective, it's predicting what Cloudy would say, given a chat log.
Upon receiving a message, Cloudy constructs a "chat log" from all previous messages in a Discord channel. The previous messages serve to build a history that serves as "memory." We then prepend a text snippet with basic contexts, such as Cloudy's name and purpose. That way, the completion engine has foundational knowledge about the bot.
Cloudy's preprocessing generates a prompt that resembles the (incomplete) transcript of a play:
The following is a conversation with an AI assistant. The assistant's name is Cloudy. The assistant is helpful, creative, clever, and very friendly.

Human: <Something the user previously said over Discord>
AI: <Cloudy's previous response to the user's message>

<Imagine more Human/AI chat history here in the same format.>

Human: <The message Cloudy just received over Discord>
AI:
GPT-3 will then infer what belongs in the last message after the AI: token. Assuming that the previous conversations have been coherent, the AI should be able to generate a convincing response.
The same concepts apply beyond conversational chat. Cloudy also generates React code, given a natural language description. It may seem like an unrelated feature, but things change once you peel away the abstraction. In reality, it's a matter of GPT-3 pattern-matching against examples of code generation.
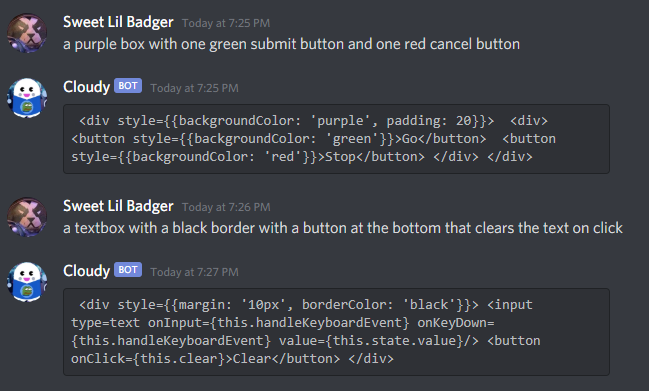
To generate code, we need to construct a prompt that resembles our previous chat log. This time, the prompt omits user messages and bot responses. Instead, it contains previous examples of descriptions and code snippets. The penultimate line should contain the user's description of the react component. The prompt concludes with a token indicating that there should be code.
description: a red button that says stop
code: <button style={{color: 'white', backgroundColor: 'red'}}>Stop</button>

description: a blue box that contains 3 yellow circles with red borders
code: <div style={{backgroundColor: 'blue', padding: 20}}>
  <div style={{backgroundColor: 'yellow', borderWidth: 1, border: '5px solid red', borderRadius: '50%', padding: 20, width: 100, height: 100}}></div>
  <div style={{backgroundColor: 'yellow', borderWidth: 1, border: '5px solid red', borderRadius: '50%', padding: 20, width: 100, height: 100}}></div>
  <div style={{backgroundColor: 'yellow', borderWidth: 1, border: '5px solid red', borderRadius: '50%', padding: 20, width: 100, height: 100}}></div>
</div>

description: (This is the placeholder for the user-provided input.)
code:
The model should recognize the pattern and realize that React code should come next.
With all the GPT-3 interactions demystified, there are two things left to do. The bot must post-process the model's output and send the results back to Discord. From the user's perspective, it appears as if Cloudy is talking to them or writing code. What they don't see is that Cloudy's busy building a prompt and guessing what should come next.
Deploying Your Bot 🚀
We have the scaffolding for a Discord bot, and we know it works with OpenAI. Now it's time to ship it! After all, the code is meaningless unless people use it.
Running in Production
Fortunately, it's pretty simple to deploy a Discord bot. All you need is a machine that will keep your bot running. Note that Discord bots don't receive incoming requests. Thus we avoid most of the complexities associated with traditional servers.
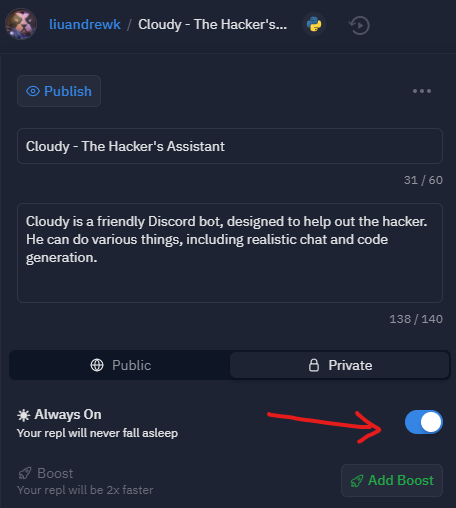
There are several free options available if you want to host a Discord bot. For Cloudy, I personally used Replit to develop and host everything. While working on the bot, I could run the code to see my changes in real-time. It could also keep the bot alive when I was away. Ever since its inception, Cloudy has constantly been running on Replit.
Inviting the Bot
There's one final step before we can get the bot in the hands of our users. Someone has to invite the bot to their Discord server. If you've set up permissions correctly, this should be the easiest step. Grab the invite link from your application page, and share it with the world!
Note: As of my writing this, I have run out of OpenAI API credits. As a result, Cloudy cannot converse or generate code for time being. (All other features still work fine.) While I appreciate the overwhelming usage and support, API access isn't cheap! 😅
Tying it All Together
We've covered the infrastructure behind Discord bots and how to get started. We've also learned how to understand and interact with machine learning APIs. To wrap things up, we deployed our code to production. Now it's time to enjoy the fruits of our labor!
Here's the REPL for Cloudy. You're free to browse and run the code at your leisure. For best results, consider forking the project and gathering your own API keys.
Happy coding!
Wow, you actually read this far? Good job! Nobody has that kind of attention span these days! 🙈

